Wednesday, November 29, 2017

Add icon into a SSIS Custom Task

Let, we have already created an SSIS custom task named HelloWorldTask. now we like to add an icon.
see my post to create the HelloWorldTask... also you can download my ready solution of this task.

now, follow the below steps to add an icon to Custom Task...

  1. Icon file should be as .ico extension - in my case, the file name is "Hello.ico"
  2. Modify the solution
  3. Build and re/install the task
now the details ... (see image also)
  1. File name is "Hello.ico".
  2. Modify the solution (see image "Add Icon to the Solution")
    • add the icon file in the solution 
      • right click on Solution Name in Solution Explorer
      • click on Add
      • click on "Existing Item..."
      • choose the icon file "Hello.ico"
    • go to Icon's property and set the "Build Action" as "Embedded Resource"
      • right click on the icon item
      • click property
    • add the icon name to the DtsTask property named "IconResource"
      • IconResource="namespaceName.IconNameWithExtension"
        • my case - IconResource="Blog_Test_Task.Hello.ico"
  3. Re/build the solution

Add Icon to the Solution

Icon Added

Monday, November 27, 2017

Install SSIS Custom Task

I assume we have a dll of our SSIS custom task. in my other post, I have already shared "how to create a SSIS custom task very easily".

assume our DLL name is: TestTask.dll

now follow the below 3 steps: [see below Image for help]
  1. install the dll in GAC 
  2. copy the dll to SSIS DTS location
  3. Test the Task is working
now the details :
  1. install the dll in GAC (see image)
      • find the GACUtill in the "Microsoft SDKs" folder... in my case, it is in "C:\Program Files (x86)\Microsoft SDKs\Windows\v7.0A\Bin\gacutil.exe"
      • if you don't have it installed .. you can download it from here (click here).
    • open Command Prompt as Administrator
    • now execute below
      • "C:\Program Files (x86)\Microsoft SDKs\Windows\v7.0A\Bin\gacutil.exe" -if "C:\TestProj\bin\Debug\Test_Task.dll"
  2. copy the dll to SSIS DTS location (see image)
      • now find your Microsoft SQL Server location and go to DTS\Task folder
      • in my case, it is in "C:\Program Files (x86)\Microsoft SQL Server\100\DTS\Tasks"
      • the folder "100" may vary due to SQL server version.
    • now copy the dll and past it to the Tasks folder, you may need administrator permission.
  3. Test the Task is working (see image)
    • open the Visual Studio.
      • close it if already open then open it again.
    • create/open an SSIS project 
    • now look at the toolbox.
    • if the task is already there then we are done
    • if the Task is not in there then follow below
      • right click on ToolBox, then click on "Chose Item".
        • OR click "Tools" menu -> click "Choose ToolBox Items..."
      • a new window will come with all of the Installed tasks...
      • go to "SSIS Control Flow Items" [in general all goes to this location]
      • select/check your Task(HelloWorld)
      • click ok


Install SSIS Custom Task

Test to Run the Task


Monday, November 20, 2017

Create SSIS Custom Task with complete example

Here i am sharing the easiest way to create a SSIS custom task.. this a "Hello World" Task.
by following this way can can create your own task very easily. also i have uploaded the solution folder, so you can modify it to create your own one.

also see my other posts to know more about SSIS custom task like a UI, Tabs on UI, Icon for your custom task etc..

Theory (be patience..)
Follow below 5 simple steps..

  1. create a blank project (.dll/library type project)
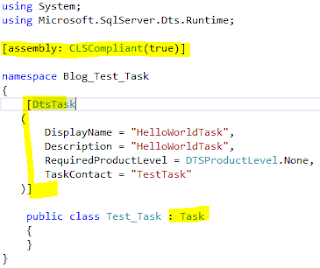
  2. add some fixed code/reference, you can say header. (Image-"Blank Project with Task Info")
  3. override 3 procedures of inherited class "Task". (Image - "Override Procedures")
  4. prepare get/set for input/output variables -- [this will be available in the expression option of SSIS task property!] (Image - "get-set")
  5. create a strong key for this dll and attache with it! (Image - "Strong Name Key")
  6. Install it (see my post)
  7. Add Icon to this Task

Detail description on above steps ...

STEP 1: create a blank "Class Library" application in visual studio. for example "Test_Task".

STEP 2: add some fixed code, you can say header.

  • Add Reference : add reference "Microsoft.SQLServer.ManagedDTS". you can find it on sql-server installed location ... "..\100\SDK\Assemblies\*.dll" (my case)
  • Use Reference: add on top "using Microsoft.Sqlserver.Dts.Runtime;"
  • Add Task Info
    • add "[assembly: CLSCompliant(true)]" outside of namespace. see image.
    • add below property for task - "[DtsTask(name="value",...)]", inside namespace but outside of class. see image
    • Inherit the class "Task"
    • see image "Blank Project with Task Info
      Blank Project with Task Info
STEP 3: override 3 procedures
  • Inherit the class "Task"
  • declare a variable to use .. my case - "private string text="Hello World SSIS...";"
  • Now override 3 procedures of Task class .. Validate, InitilizeTask & Execute
  • add code of lines from the image "override procedures".
    • you can modify as you want
Override Procedures
STEP 4: prepare get/set for input/output variables
  • prepare get-set for your variables ... see image "get-set"
  • in my case this is "public string TestInput { get { return this.txet;} set { this.txet = value;}}"
get-set
STEP 5: create a strong key for this dll and attache with it! (see image for all - "Strong Name Key")
  • NOW BUILD the SOLUTION
  • a .dll file will be available in the debug OR release folder. thats out required .dll file :)
  • go to "project properties". [on solution explorer ->right click on solution-> click properties]
  • click -> "Signing" tab
  • check "Sign the assembly"
  • select "<New>.." [new window will open]
  • un-check "Protect .. Password"
  • give a name for you Stron Name Key (.snk) file in "Key file name".. my case "Test_Task"
  • click "OK"
  • a new item (.snk file) will be available (at bottom) in the "solution explorer". my case "Test_Task.snk"
  • save the solution (ctrl+s)
  • NOW BUILD the SOLUTION
  • now the dll is ready to install in GAC .. check my post to install this dll as SSIS Task
Strong Name Key

Friday, November 10, 2017

Access FTP (FTP, FTPS & SFTP) anywhere without install

We have to do many things to access FTP on our day-to-day works. sometimes we write the same thing many times for the same...

Now, I am sharing my tool to upload/download/move/remove from/to FTP/FTPS/SFTP.. this tool has many options like access FTP through different port/SSH/TLS ...

DOWNLOAD HERE - FTP_Action.zip (4.7MB)

Description of this tool: all you have to do just create a command file and execute FTP_Action.exe with this command file. This command file can contain multiple FTP server access. That means you don't have to write separate command & run this for separate FTP servers. you can put all together and execute once. after executing the command file, it will generate a log file about the executed operations (you may skip this).

How to use:
  1. Extract the zip in a separate folder [in my case "C:\FTP_Tool"]
  2. you will find the below files - you have to always keep below file together in a location
    • FTP_Action.exe
    • FTP_Action.ReadMe
    • WinSCP.exe
    • WinSCPnet.dll
  3. Create the command file [in my case, command file is in "C:\SFTP\FTP_COMMAND.txt"]
    • See ReadMe\Sample Command Section file to create the command file
    • Open a text file.
    • write your commands.
    • save the file.
    • Command Example of Command file
      • open sftp://USER_NAME:PASSWORD@FTP_ADDRESS_OR_IP:PORT/ -SSH
      • put "C:\SFTP\TEST_UPLOAD.txt" "/Prod/TEST_UPLOAD.csv"
      • no need to add "bye" command. this tool will close session/connection when finished or open the next connection.
  4. Now i have command file and executable
    • FTP_Action in "C:\FTP_Tool\FTP_Action.exe"
    • Command file is "C:\SFTP\FTP_COMMAND.txt"
Now Execute the command file as below :
  1. open cmd/command prompt.
  2. go to "working location - C:\FTP_Tool" - optional/required if not work in other location
    • cd C:\FTP_Tool
  3. command - executable with file name (full path) as parameter
    • "C:\FTP_Tool\FTP_Action.exe" "C:\SFTP\FTP_COMMAND.txt"
  4. if you want a log file of this operation, then mention a log file name (full path) as second parameter
    • "C:\FTP_Tool\FTP_Action.exe" "C:\SFTP\FTP_COMMAND.txt" "C:\SFTP\FTP_COMMAND_LOG.log"
  5. if you want a system generated log file name, then mention a location (followde by '\') as second parameter instead of file name.
    • "C:\FTP_Tool\FTP_Action.exe" "C:\SFTP\FTP_COMMAND.txt" "C:\SFTP\"


Please Check the ReadMe File ....

Use below command to execute/use this tool …
-----------------------
From CMD/Command Prompt --
Command:
FTP_Action.exe COMMAND_PATH [LOG_PATH] [Options]

COMMAND_PATH : Full path of the command file. to create a command file see section "Command File Syntax"
LOG_PATH     : (optional) Full path of the log file. a log file would be generated after execution. If file name not mentioned, Log file name will contain DateTime info and a part of command file name [i.e. 20171102035012_CMD.log when the command file name is CMD.txt]

Command Options:
-SSL : only for SFTP connection
-TLS : this option is required if the FTP connection need KEY FingerPrint
-SSLI : this is required for secure FTP connection with Implicit encryption
-SSLE : this is required for secure FTP connection with Explicit encryption

example :

FTP_Action.exe "D:\tmp\SFTP\SFTP_COMMAND.txt"

FTP_Action.exe "D:\tmp\SFTP\SFTP_COMMAND.txt" "D:\tmp\SFTP\SFTP_COMMAND_LOG.log"

Command File Syntax ... [in this case - the file is "D:\tmp\SFTP\SFTP_COMMAND.txt"]
-----------------------
open sftp://USERNAME:PASSWORD@ABC123.rxcorp.com/ -SSH
put "D:\tmp\SFTP\TEST_UPLOAD.txt" "/mnt/sql/TEST_UPLOAD_PUT.csv"
mov "/mnt/sql/TEST_UPLOAD_PUT.csv" "/mnt/sql/TEST_UPLOAD_PUT_MOV.csv"
rnm "/mnt/sql/TEST_UPLOAD_PUT_MOV.csv" "/mnt/sql/TEST_UPLOAD_PUT_MOV_RNM.csv"
get "/mnt/sql/TEST_UPLOAD_PUT_MOV_RNM.csv" "D:\tmp\SFTP\TEST_UPLOAD_PUT_MOV_RNM_DWN.csv"
del "/mnt/sql/TEST_UPLOAD_PUT_MOV_RNM.csv"

open ftp://USERNAME:PASSWORD@192.44.12.94/
mkdir "/Prods/Data"
put "D:\tmp\SFTP\TEST_UPLOAD.txt" "/Prods/TEST_UPLOAD_PUT.csv"
get "/Prods/TEST_UPLOAD_PUT.csv" "D:\tmp\SFTP\TEST_UPLOAD_PUT_GET.txt"
del "/Prods/TEST_UPLOAD_PUT.csv"

How to install FTP_Action in other server
---------------------------------------------
copy below files together to any location. keep all files together in one place to work.
1. FTP_Action.exe
2. WinSCPnet.dll
3. WinSCP.exe
4. FTP_Action.ReadMe

Tuesday, November 7, 2017

Split ZIP in JAVA (limit ZIP size)

I am using below code/class to split and zip a large amount/size of files using JAVA.
I have tested this code/class on below

 - number of uncompressed files : 116
 - total size (uncompressed) : 29.1 GB
 - ZIP file size limit (each) : 3 GB [MAX_ZIP_SIZE]
 - total size (compressed)   : 7.85 GB
 - number of ZIP file (splited as MAX_ZIP_SIZE): 3

In my code, MAX_ZIP_SIZE set to 3 GB ([ZIP has limitation of 4GB on various things]).

you need to change MAX_ZIP_SIZE value as per your requirement ...

////////////////////////// JAVA Code \\\\\\\\\\\\\\\\\\\\\\\\
    import java.io.FileInputStream;
    import java.io.FileNotFoundException;
    import java.io.FileOutputStream;
    import java.io.IOException;
    import java.util.zip.ZipEntry;
    import java.util.zip.ZipOutputStream;

    public class QDE_ZIP {

        public static String createZIP(String directoryPath, String zipFileName, String filesToZip) {
            try {
                final int BUFFER = 104857600; // 100MB
                final long MAX_ZIP_SIZE = 3221225472L; //3 GB
                long currentSize = 0;
                int zipSplitCount =0;
                String files[] = filesToZip.split(",");
                if (!directoryPath.endsWith("/")) {
                    directoryPath = directoryPath + "/";
                }
                byte fileRAW[] = new byte[BUFFER];
                ZipOutputStream zipOut = new ZipOutputStream(new FileOutputStream(directoryPath + zipFileName.toUpperCase()));
                ZipEntry zipEntry;
                FileInputStream entryFile;
                for (String aFile : files) {
                    zipEntry = new ZipEntry(aFile);
                    if (currentSize >= MAX_ZIP_SIZE)
                    {
                        zipSplitCount ++;
                        zipOut.close();
                        zipOut = new ZipOutputStream(new FileOutputStream(directoryPath + zipFileName.toLowerCase().replace(".zip", "_"+zipSplitCount+".zip").toUpperCase()));
                        currentSize = 0;
                    }
                    zipOut.putNextEntry(zipEntry);
                    entryFile = new FileInputStream(directoryPath + aFile);

                    int count;
                    while ((count = entryFile.read(fileRAW, 0, BUFFER)) != -1) {
                        zipOut.write(fileRAW, 0, count);
                    }
                    entryFile.close();
                    zipOut.closeEntry();
                    currentSize += zipEntry.getCompressedSize();
                }
           
                zipOut.close();
                //System.out.println(directory + " -" + zipFileName + " -Number of Files = " + files.length);
            } catch (FileNotFoundException e) {
                return "FileNotFoundException = " + e.getMessage();
            } catch (IOException e) {
                return "IOException = " + e.getMessage();
            } catch (Exception e) {
                return "Exception = " + e.getMessage();
            }

            return "1";
        }

    }

////////////////////////// End JAVA Code \\\\\\\\\\\\\\\\\\\\\\\\

NOTE: I have returned all *Exception Messages* as String to work with it. this my own case related to project.