By executing below SQL Query, you will get the list of connected users with the last running SQL Statement by each user...
Who is connected
---------------------
CREATE TABLE #WHO_TEST(
[spid] [int] NULL,
[ecid] [int] NULL,
[status] [nvarchar](50) NULL,
[loginame] [nvarchar](50) NULL,
[hostname] [nvarchar](500) NULL,
[blk] [nvarchar](50) NULL,
[dbname] [nvarchar](500) NULL,
[cmd] [nvarchar](500) NULL,
[request_id] [int] NULL
)
insert into #WHO_TEST
EXEC sp_who;
SELECT *,(SELECT TEXT FROM sys.dm_exec_sql_text((select sql_handle FROM sys.sysprocesses WHERE spid = a.spid))) SQL_CMD
from #WHO_TEST a
Drop Table #WHO_TEST
Friday, November 16, 2018
Monday, September 3, 2018
Attach/Use SD Card as Internal Storage (No Root), Android
I have attached my SD Card as Internal Storage in my Samsung Galaxy J2 Prime without Root my phone, and its working fine fo...me.. please see below to perform the same in your phone.
we need to follow the below steps to complete the task ...
1. Executes the ADB commands to Format the SD Card as Internal Storage
2. Migrate all data to SD Card to complete the task.
Let me explain above two steps in details ...
STEP 1:
1.1: Enable USB Debugging in your phone.
1.1.1: To enable developer option -> go to "About Phone" -> go to "Software Info" -> tap seven (7) times on "Build Number"
1.1.2: go to "Settings" -> "Developer Options" -> enable "USB Debugging"
1.2: Download ADB Shell (Windows) and Universal Android Driver (support almost all device)
1.2.1: Extract both ZIP and setup Android Driver only.
1.3: Connect USB cable between Phone and PC
1.4: Allow Debugging on your Phone screen (new popup window with MAC Address) -> 'Press OK'
1.5: Open Command Prompt .. Run -> "CMD"
1.6: Go to "ADB Shell" extract folder -> cd "C:\ADB_Shell" (this is my case)
1.7: execute below commands
example: sm partition disk:179,64 private
1.8: Once rebooted/ restarted, you are done to Format as Internal Storage
STEP 2: Let Android know that you attached an SD Card as an internal storage...
2.1: Go to Settings
2.2: Tap on Storage (OR "Device Maintenance" -> "Storage")
2.3: Tap on "SD Card" [OR Tap on Menu (top/bottom three (3) dots) -> "Storage Settings"]
2.4: Tap on Menu (top/bottom three (3) dots)
2.5: Tap on "Migrate Data" -> next -> finish
2.6: All is set now...
From Now Android OS will decide which app/file would be stored where ... this is very efficient ...
Enjoy ;)
we need to follow the below steps to complete the task ...
1. Executes the ADB commands to Format the SD Card as Internal Storage
2. Migrate all data to SD Card to complete the task.
Let me explain above two steps in details ...
STEP 1:
1.1: Enable USB Debugging in your phone.
1.1.1: To enable developer option -> go to "About Phone" -> go to "Software Info" -> tap seven (7) times on "Build Number"
1.1.2: go to "Settings" -> "Developer Options" -> enable "USB Debugging"
1.2: Download ADB Shell (Windows) and Universal Android Driver (support almost all device)
1.2.1: Extract both ZIP and setup Android Driver only.
1.3: Connect USB cable between Phone and PC
1.4: Allow Debugging on your Phone screen (new popup window with MAC Address) -> 'Press OK'
1.5: Open Command Prompt .. Run -> "CMD"
1.6: Go to "ADB Shell" extract folder -> cd "C:\ADB_Shell" (this is my case)
1.7: execute below commands
adb shell
sm list-disks
sm partition disk:<disk number from previous command> private
rebootReplace <disk number from the previous command> with the output of the previous command.
example: sm partition disk:179,64 private
1.8: Once rebooted/ restarted, you are done to Format as Internal Storage
STEP 2: Let Android know that you attached an SD Card as an internal storage...
2.1: Go to Settings
2.2: Tap on Storage (OR "Device Maintenance" -> "Storage")
2.3: Tap on "SD Card" [OR Tap on Menu (top/bottom three (3) dots) -> "Storage Settings"]
2.4: Tap on Menu (top/bottom three (3) dots)
2.5: Tap on "Migrate Data" -> next -> finish
2.6: All is set now...
From Now Android OS will decide which app/file would be stored where ... this is very efficient ...
Enjoy ;)
Wednesday, August 29, 2018
Compress/Shrink SQL Server Database/Table/Index, tSql
When our database size was too large, we need to compress or shrink data to reduce the disk/file/database size. I will provide some guidance to reduce the database/index size to the minimal which ensure the high availability of disk space.
I will discuss below points to Compress as much as possible ...
I will discuss below points to Compress as much as possible ...
- Find the Tables need to Compress
- Estimate the Compression rate/size.
- Compress the Table Data in Page Level. (it can be in ROW level)
- Compress the Index size in Page Level. (it can be in ROW level)
- Compress/Shrink full database.
NOTE: If any table has Sparse Column, we can't compress that table/index directly.
1. First of all, we have to find the affected/large in size Tables. Use below SQL to Find the large Tables.
----------------------------------------------------
-- Determine which tables to compress
SELECT
t.NAME AS TableName,
i.name as indexName,
sum(p.rows) as RowCounts,
sum(a.total_pages) as TotalPages,
sum(a.used_pages) as UsedPages,
sum(a.data_pages) as DataPages,
(sum(a.total_pages) * 8) / 1024 as TotalSpaceMB,
(sum(a.used_pages) * 8) / 1024 as UsedSpaceMB,
(sum(a.data_pages) * 8) / 1024 as DataSpaceMB
FROM
sys.tables t
INNER JOIN
sys.indexes i ON t.OBJECT_ID = i.object_id
INNER JOIN
sys.partitions p ON i.object_id = p.OBJECT_ID AND i.index_id = p.index_id
INNER JOIN
sys.allocation_units a ON p.partition_id = a.container_id
WHERE
t.NAME NOT LIKE 'dt%' AND
i.OBJECT_ID > 255 AND
-- i.index_id <= 1
GROUP BY
t.NAME, i.object_id, i.index_id, i.name
ORDER BY
object_name(i.object_id)
----------------------------------------------------
2. After getting the table and index list; Now we have to estimate the size compression, how much size we can reduce.
Use below SQL to check the reduced size.
----------------------------------------------------
-- For Table Data Compression
EXEC sp_estimate_data_compression_savings
@schema_name = 'dbo',
@object_name = 'DATABASE_NAME',
@index_id = NULL, -- For Table Data Compression
@partition_number = NULL,
@data_compression = 'Page' ;
-- For Index Data Compression
EXEC sp_estimate_data_compression_savings
@schema_name = 'dbo',
@object_name = 'DATABASE_NAME',
@index_id = 1, -- Index ID -- For Index Data Compression
@partition_number = NULL,
@data_compression = 'Page' ;
----------------------------------------------------
3. After making the final list of Table, we can now compress the table using below SQL
----------------------------------------------------
ALTER TABLE dbo.TABLE_NAME REBUILD PARTITION = ALL WITH (DATA_COMPRESSION = PAGE);
----------------------------------------------------
4. After Table Compression, we now can compress the Indexes (one by one) ..
----------------------------------------------------
ALTER INDEX INDEX_NAME ON dbo.TABLE_NAME REBUILD PARTITION = ALL WITH (DATA_COMPRESSION = PAGE);
----------------------------------------------------
5. Finally we can Shrink/Compress the full database .. use below SQL ..
Bellow command have some other parameters, for details please check DBCC SHRINKDATABASE (Transact-SQL)
----------------------------------------------------
DBCC SHRINKDATABASE(N'DATABASE_NAME');
----------------------------------------------------
NOTE: You may use the procedure sp_spaceused to track the data size
all above is the example which I did for a database of 1 TB. You can choose your own compression strategy to compress the database or files.
Thursday, August 16, 2018
Import CSV file to SQL Server, Mule 4 (MuleSoft)
To Import a CSV file (with header) to the SQL Server database, I will take an HTTP Listener to call the process then read the CSV file and insert to DB as BULK INSERT.
To do this, I will follow the below steps ...
 |
| Import CSV File to SQL Server DB |
To do this, I will follow the below steps ...
- add a Flow of HTTP Listener
- add a Fiel Read Component
- add a Bulk Insert component
Before Start, our example CSV file will look like as below formate
CSV file Contant (DataLoad.csv)
-----------------------
ID,NAME
1,Azam
2,Saiful
Create a Blank Mule Project First :)
STEP 1: Add HTTP Listener and Configure it to invoke from browser or postman.
Double Click on HTTP Listener component to Configure
Provide a Name for your HTTP Listener - in my case, /insertcsv
Provide the Path as "/yourpath" - in my case, /insertcsv
Click on "+" Button to Create and Configure the HTTP Listener Connection
Provide a Name for your Connector - in my case, HTTP_Listener_config
Provide the Host IP - in my case, I used 0.0.0.0 to invoke from anywhere of my network
Provide the Port Number - - in my case, 8081
Set Base Path as "/"
Test the Connection to check the port is open to use - Click on "Test Connection..." Button
Click "OK"
Add a Response Message to Display in Browser, if everything works fine - in my case, the message is "Data Inserted ..."
 |
| HTTP Listener Configuration |
 |
| HTTP Response |
STEP 2: Add File-Read Component and Configure it to Read the CSV file.
Provide the Display name - in my case, Read CSV File
To add a Connector Configuration, Click "+" button
Give a name for this Configuration - "File_Config"
Set Working Directory (where is your file located) - "E:\something"
Test the Connection and Click OK
Finally, provide the File Name OR Fully Qualified Name - "DataLoad.csv"
 |
| File-Read Component Configuration |
STEP 3: Add a Bulk Insert Component and Configure it to get data and insert.
Now, First add a Connection of SQL Server Database.
Click the "+" button of "Connector Configuration".
Give a Connection name - Database_Config
Choose "Microsoft SQL Server Connection" as Connection
If required, Click on "Modify dependency" then click "Install" then click "Finish"
Now provide Connection details ...
Host Name - SQL Server instance name OR IP
Port - 1433 (default port of SQL Server)
User - SQL Server User
Password - Password of above SQL Server User
Database Name - which database you want to import CSV File.
 |
| SQL Server Connection Conf |
After Create the Connection, we have to add INSERT SQL and Parameter to read the Payload message (data object)
Add below Insert SQL at "SQL Query Text:" section/field
----------------------------------
insert into dbo.DataLoad (ID,NAME) values (:IN_ID,:IN_NAME)
----------------------------------
Here :IN_ID and :IN_NAME are the parameters for this INSERT command
After adding the SQL text, now we will add a MAP code to pass the value to these parameters.
Add below code to "Input Parameters:" section/field ...
----------------------------------
#[%dw 2.0
output application/json
---
payload map {
'IN_ID': $.ID,
'IN_NAME': $.NAME
}]
----------------------------------
here :IN_ID and :IN_NAME are the parameter of INSERT Command.
 |
| Input Parameters and SQL Query Text |
Thats All :)
now run the project/application - Right click on the Flow and select "Run Project Dataloadcsv"
once the application is run, open the browser and hit the url - "http:/localhost:8081/insertcsv"
you will get the response message "Data Inserted ..." once all done.
Please feel free to comments.
Thursday, August 2, 2018
Check INDEX Status and REBUILD Index, SQL Server
When you need to check the health or status of all INDEXs and need to REBUILD the required INDEXs depends on the Fragmentation level (%), you can get help from below SQL queries.
In my example, I will show how to get the fragmented indexes which have above 20% fragmentation level.
In my example, I will show how to get the fragmented indexes which have above 20% fragmentation level.
INDEX STATUS check
------------------------------------------
SELECT dbschemas.[name] AS 'SchemaName',
dbtables.[name] AS 'TableName',
dbindexes.[name] AS 'IndexName',
ROUND(indexstats.avg_fragmentation_in_percent,2) AS avg_fragmentation_in_percent,
indexstats.page_count
FROM sys.dm_db_index_physical_stats (DB_ID(), NULL, NULL, NULL, NULL) AS indexstats
INNER JOIN sys.tables dbtables
ON dbtables.[object_id] = indexstats.[object_id]
INNER JOIN sys.schemas dbschemas
ON dbtables.[schema_id] = dbschemas.[schema_id]
INNER JOIN sys.indexes AS dbindexes
ON dbindexes.[object_id] = indexstats.[object_id]
AND indexstats.index_id = dbindexes.index_id
WHERE indexstats.database_id = DB_ID()
AND dbindexes.type_desc = 'NONCLUSTERED'
AND dbindexes.[name] IS NOT NULL
AND indexstats.avg_fragmentation_in_percent > 20
ORDER BY
ROUND(indexstats.avg_fragmentation_in_percent,2) DESC
------------------------------------------
Now using below SQL, I will create the REBUILD command to Defragment the infected indexes...
SQL to generate Rebuild Command
------------------------------------------
SELECT
'ALTER INDEX '+dbindexes.[name]+' on '+dbschemas.[name]+'.'+ dbtables.[name]+' REBUILD;',
dbschemas.[name] AS 'SchemaName',
dbtables.[name] AS 'TableName',
dbindexes.[name] AS 'IndexName',
ROUND(indexstats.avg_fragmentation_in_percent,2) AS avg_fragmentation_in_percent,
indexstats.page_count
FROM sys.dm_db_index_physical_stats (DB_ID(), NULL, NULL, NULL, NULL) AS indexstats
INNER JOIN sys.tables dbtables
ON dbtables.[object_id] = indexstats.[object_id]
INNER JOIN sys.schemas dbschemas
ON dbtables.[schema_id] = dbschemas.[schema_id]
INNER JOIN sys.indexes AS dbindexes
ON dbindexes.[object_id] = indexstats.[object_id]
AND indexstats.index_id = dbindexes.index_id
WHERE indexstats.database_id = DB_ID()
AND dbindexes.type_desc = 'NONCLUSTERED'
AND dbindexes.[name] IS NOT NULL
AND indexstats.avg_fragmentation_in_percent > 20
ORDER BY
ROUND(indexstats.avg_fragmentation_in_percent,2) DESC
------------------------------------------
Wednesday, August 1, 2018
SSIS Task to Create Excel Report/ Export Data to Excel with Header using SQL Statement, With Example
When we plan to automate a Process/System; sometimes we need to generate an Excel report to check the process status or create QC report using Excel to deliver or for internal use. Also somewhere we need formatted excel report for quick check the failure/warning status. For this, I have created an SSIS Custom Task to create a formatted excel report with/o header.
I am sharing this Task (DLL) and will discuss the use. click below link to download the .dll files.I have created two version of this Task depends on .NET version.
- Download for .NET version 3.5 - ExcelReport_NET-V3.5.zip
- Download for .NET version 4 - ExcelReport_NET-V4.zip (Updated UI)
Install supporting dlls also, comes with the ZIP.
After the installation, you will get the SSIS task in the Tool list.
 |
| After Install the Excel Report Task |
Description of the Task with Example
Now, consider the below example to understand the use of this Task.
Let I have to create an Excel report of Employee List where I would mark all names as RED if his/her age is Above/Equal 40.
All employee information is available in a DB table named EMP_INFO.
Also, I have to put report information at the top of the Excel sheet, like Report Name, Report Creation Date etc.
So that, technically I will create an Excel Report which will contain the report information at the top of the sheet followed by the Employee information with the RED mark depends on the emp age (40).
Let's start to Configure the Task to generate
1. Double Click on the Task to Edit the Property using UI.
 |
| Excel Report Task UI |
2. There are 5 sections available to give parameters value.
First one is the General Section, where you can change the Task name and description
The second one is DB info, Where I will put DB connection related info like Server Name, Database Name etc.
The third is Query, which is the SQL statement for the Report Header and Data/Body information.
The Forth is Excel Info, which is Excel related info, like Excel File name, Path to save the file, is the Excel file is New or Old, which sheet you want to modify if the Excel File already exists.
The Fifth and the Last one is Excel Formatting, by which we will Format the Excel Row/Column/Cell depends on some condition.
3. Now I am filling all the required field to generate the example employee report.
First, I will provide the DB info to connect the Database and run the SQL statement.
Second, I will provide two SQL. One for the Report information (Header) and the other for the Employee Information
Select "Employee List with Age Information" [Report Name], getutcdate() as [REPORT Creation Date]
Select ID as EMP_ID, Name, Age from [dbo].[EMP_INFO]Third, I will put the Excel File Information
- OutputFilePath -> Excel File Path -> E:\TMP (in my case)
- OutputFileName -> Excel File Name -> Emp_Report.xls (in my case)
- IsFileNewOrOld -> New or Existing -> new (in my case)
- SheetName -> Output Sheet Name -> Emp List (in my case)
- SheetNumber -> Position Of the Sheet -> 1 (in my case, I like to see as the first sheet)
- ColumnFormatString -> Clause to Formate Full Column/Cell with a condition -> HN,Age,GE,40,HN,Name,FM,B; (in my case, see description section of UI for the menning of HN,GE,FM etc)
- RowFormatString -> HN,Age,GE,40,CL,250;10;10; (in my case)
After setting all the property, it will look like below image ...
 |
| After Set all Property |
 |
| Excel Report with all Condition |
NOTE: For Property Description, please select the property and look at the description section of UI.
 |
| Property Description |
Friday, July 6, 2018
Prepare Secondary Database for Mirroring, SQL Server
When you plan to Mirroring Database, first you have to prepare the Secondary Database.
Follow below steps to prepare the secondary database for mirroring...
STEP 1: Take Backup of Principal Database.
RESTORE DATABASE TEST_DB
Follow below steps to prepare the secondary database for mirroring...
STEP 1: Take Backup of Principal Database.
- Take Full Database Backup of Principal Database.
- BACKUP DATABASE TEST_DB TO DISK = N'C:\TEST\TEST_DB.BAK'
- Take a Transaction Log Backup of Principal Database
- BACKUP LOG TEST_DB TO DISK = 'C:\TEST\TEST_DB.TRN'
NOTE: Do not make any changes in the Principal database after the Log Backup has been done.
STEP 2: Restore Full and Log Backup to Secondary Database.
- Copy the Backup files to a location which is accessible from Secondary Database
- Restore Full Backup WITH NORECOVERY to Secondary Database
- Restore Transaction Log Backup WITH NORECOVERY to Secondary Database
Restore Database
FROM DISK = N'C:\TEST\TEST_DB.BAK'
WITH NORECOVERY;
If you want to replace the existing database:
RESTORE DATABASE TEST_DB
FROM DISK = N'C:\TEST\TEST_DB.BAK'
WITH NORECOVERY, REPLACE;
NOTE: If REPLACE not worked for existing database, ALTER database as SINGLE_USER. Then try again to restore with NORECOVERY.
ALTER DATABASE TEST_DB
SET SINGLE_USER
WITH ROLLBACK IMMEDIATE;
If you want to move the data file (.mdf / .ldf) location:
-- logical_file_name is the name of the .mdf file in the database.
-- physical_path is the drive/network location, which is accessible from the secondary database
-- Retrive DB File name
-- select * from sys.database_files
RESTORE DATABASE TEST_DB
FROM DISK = N'C:\TEST\TEST_DB.BAK'
WITH NORECOVERY,
MOVE logical_file_name to 'physical_path\TEST_DB.mdf',
MOVE logical_file_name_log to 'physical_path\TEST_DB.ldf' ;
Restore Database Log
RESTORE LOG TEST_DB
FROM DISK = 'C:\TEST\TEST_DB.TRN'
WITH NORECOVERY;
Monday, July 2, 2018
SQL Server Mirroring using Certificate Authentication, NO Domain User
When we use SQL Server Locally/Home PC, it is not possible to get Domain User to practics Mirroring.
Now I will describe how we can Mirror SQL Server Database, locally/Without Domain User, to another instance.
I assume the Secondary Database is in Virtual Metchin (VM/VDI). [It can be the same PC BUT another instance]
NOTE: Create Inbound & Outbound Port Rule in Windows Firewall. in this example, I am using 5022 port for Mirroring only.
[[ Prepare Secondary Database for Mirroring ]]
Now, I will follow below 5 steps to complete mirroring. for this, I assume below things...
Principal Database Name: TEST_DB
Principal Server: SQLPRIN
Secondary Database Name: TEST_DB [Assuming the Secondary Database is in Restore mode to start Mirroring]
Secondary Server: SQLSEC
Mirror port for both: 5022
NOTE: If you use same PC/Server with a different instance, please use the different port for Principal and Secondary server; like 5022 for Principal and 5023 for Secondary. Make sure the firewall port rule for both ports.
NOTE: All the steps have been divided into two parts. SETP 1 & 2 for Outbout Authentication and STEP 3 & 4 for Inbound Authentication of SQL Server.
ALL OF THE BELOW STEPS SHOULD BE DONE BY A USER WHICH HAS SYSADMIN ROLE.
STEP 1: For authentication, as there is no Domain User, we will use SQL Server Certificate.
We have to create Certificate using Master Key for the both, Principal & Secondary.
First, create a Master Key then create the Certificate
NOTE: If the SQL Server instance already has a Certificate [have been created for another purpose, like Encreption], we may use that Certificate instead of creating a new one.
We can check all the existing certificates using below SQL:
SELECT * FROM sys.certificates;
Principal Server Certificate Creation:
USE master;
CREATE MASTER KEY ENCRYPTION BY PASSWORD = 'password';
CREATE CERTIFICATE SQLPRIN_CER
WITH SUBJECT = 'SQLPRIN certificate for database mirroring',
EXPIRY_DATE = '01/01/2020';
Secondary Server Certificate Creation:
USE master;
CREATE MASTER KEY ENCRYPTION BY PASSWORD = 'password';
CREATE CERTIFICATE SQLSEC_CER
WITH SUBJECT = 'SQLSEC certificate for database mirroring',
EXPIRY_DATE = '01/01/2020';
STEP 2: Create Endpoint using above certificate to communicate with each other.
NOTE: If you already have an Endpoint for Mirroring with Windows Authentication (NEGOTIATE) and don't want to drop that, then please check the post to create Endpoint which supports both, Windows and Certificate Authentication. "Endpoint for Mirroring with Windows & Certificate Authentication in SQL Server"
-- To check available Endpoints use below SQL
SELECT * FROM sys.database_mirroring_endpoints;
-- To Drop an Endpoint
DROP ENDPOINT Endpoint_Name
Principal Server Endpoint Creation:
USE master;
CREATE ENDPOINT Mirroring_P
STATE = STARTED
AS TCP (
LISTENER_PORT=5022
, LISTENER_IP = ALL
)
FOR DATABASE_MIRRORING (
AUTHENTICATION = CERTIFICATE SQLPRIN_CER
, ENCRYPTION = REQUIRED ALGORITHM AES
, ROLE = ALL
);
Secondary Server Endpoint Creation:
USE master;
CREATE ENDPOINT Mirroring_S
STATE = STARTED
AS TCP (
LISTENER_PORT=5022
, LISTENER_IP = ALL
)
FOR DATABASE_MIRRORING (
AUTHENTICATION = CERTIFICATE SQLSEC_CER
, ENCRYPTION = REQUIRED ALGORITHM AES
, ROLE = ALL
);
NOTE: Choose REQUIRED ALGORITHM for ENCRYPTION as per your requirements. SQL Server supports both, AES & RC4. For more details please check Create Endpoint.
STEP 3: Backup Certificate as a file for the Partner Database (Principal to/from Secondary). Then Copy the .cer file to the partner pc for later use.
-- Check existing Certificates
select * from sys.certificates
Principal Server Certificate Backup:
USE master;
BACKUP CERTIFICATE SQLPRIN_CER TO FILE = 'C:\SQL_Certificate\SQLPRIN_CER.cer';
NOTE: Copy the file, SQLPRIN_CER.cer, to the Secondary server.
Secondary Server Certificate Backup:
USE master;
BACKUP CERTIFICATE SQLSEC_CERTO FILE = 'C:\SQL_Certificate\SQLPRIN_CER.cer';
NOTE: Copy the file, SQLSEC_CER.cer, to the Principal server.
STEP 4: Now will perform below tasks to use above Certificate Files.
- Create Login for Partner
- Create User for above Login (1)
- Create Certificate for above User (2) using Coppid Partner's Certificate File
- Grand Connect to the Endpoint for above Login (1)
Principal Server Tasks:
USE master;
-- Create Login for Partner (Secondary)
CREATE LOGIN SQLSEC_LOGIN WITH PASSWORD = 'password';
-- Create User for above Login (1)
CREATE USER SQLSEC_USER FOR LOGIN SQLSEC_LOGIN ;
-- Create Certificate for above User (2) using Coppid Partner's (Secondary) Certificate File
CREATE CERTIFICATE SQLSEC_CER_FOR_PRIN
AUTHORIZATION SQLSEC_USER
FROM FILE = 'C:\SQL_Certificate\SQLPRIN_CER .cer'
-- Grand Connect to the Endpoint for above Login (1)
GRANT CONNECT ON ENDPOINT::Mirroring_P TO SQLSEC_LOGIN ;
Secondary Server Tasks:
USE master;
-- Create Login for Partner/ Principal
CREATE LOGIN SQLPRIN_LOGIN WITH PASSWORD = 'password';
-- Create User for above Login (1)
CREATE USER SQLPRIN_USER FOR LOGIN SQLPRIN_LOGIN ;
-- Create Certificate for above User (2) using Coppid Partner's (Principal) Certificate File
CREATE CERTIFICATE SQLPRIN_CER_FOR_SEC
AUTHORIZATION SQLPRIN_USER
FROM FILE = 'C:\SQL_Certificate\SQLPRIN_CER.cer'
-- Grand Connect to the Endpoint for above Login (1)
GRANT CONNECT ON ENDPOINT::Mirroring_S TO SQLPRIN_LOGIN ;
STEP 5 : (Final STEP) Set partner for each other.
NOTE: It is must to set Partner in Secondary/Mirror server FIRST.
If Server Name failed to set Partner, use IP instead.
Secondary Server Partner:
USE master;
ALTER DATABASE TEST_DB
SET PARTNER = 'TCP://SQLPRIN:5022';
-- SET PARTNER = 'TCP://192.168.56.1:5022';
Principal Server Partner:
USE master;
ALTER DATABASE TEST_DB
SET PARTNER = 'TCP://SQLSEC:5022';
-- SET PARTNER = 'TCP://192.168.56.2:5022';
If SET PARTNER Failed, perform below tasks
- SET Partner Off in Secondary
- Check Windows Firewall Rule is Enabled
- Check the Port is Open (using Telnet)
-- SET Partner Off in Secondary
Secondary Server Partner:
USE master;
ALTER DATABASE TEST_DB
SET PARTNER OFF;
-- Check Windows Firewall Rule is Enabled
-- Check the Port is Open (using Telnet)
telnet [domainname or ip] [port]
-->ex --> telnet SQLSEC 5022 OR telnet 192.168.56.2 5022
Please let me know if you get any problem, in comments.
Thursday, June 28, 2018
Endpoint for Mirroring with Windows & Certificate Authentication in SQL Server
Sometimes we fall in problem when need to mirror multiple databases by using different Windows-Authentication and Certificate.
in this case, we have to create Endpoint using both authentications along with the required certificate ...
to achieve dual authentication in the same Endpoint, we have to use WINDOWS NEGOTIATE and CERTIFICATE CER_NAME as AUTHENTICATION and also we have to mansion the ENCRYPTION algorithm for both.
in this example, I have used RC4 and AES for WINDOWS and CERTIFICATE authentication.
CREATE ENDPOINT Mirroring
STATE = STARTED
AS TCP (
LISTENER_PORT=5022
, LISTENER_IP=ALL
)
FOR DATABASE_MIRRORING (
AUTHENTICATION = WINDOWS NEGOTIATE CERTIFICATE SQLHOST_CER
, ENCRYPTION = REQUIRED ALGORITHM RC4 AES
, ROLE = ALL
);
:::: SQLHOST_CER is the SQL Server Certificate authentication
CREATE CERTIFICATE SQLHOST_CER
WITH SUBJECT = 'SQLHOST certificate for database mirroring',
EXPIRY_DATE = '01/01/2020';
::::: set ENCRYPTION as per your need; you can set any encryption for any authentication.
-- To check available Endpoints use below SQL
SELECT * FROM sys.database_mirroring_endpoints;
-- To Drop an Endpoint
DROP ENDPOINT Endpoint_Name
////***
If you need to create Endpoint with only one authentication then use any one as AUTHENTICATION option
For WINDOWS Authentication
-----------------------------
CREATE ENDPOINT Mirroring
STATE = STARTED
AS TCP (
LISTENER_PORT=5022
, LISTENER_IP=ALL
)
FOR DATABASE_MIRRORING (
AUTHENTICATION = WINDOWS NEGOTIATE
, ENCRYPTION = REQUIRED ALGORITHM RC4
, ROLE = ALL
);
For CERTIFICATE Authentication
-----------------------------
CREATE ENDPOINT Mirroring
STATE = STARTED
AS TCP (
LISTENER_PORT=5022
, LISTENER_IP=ALL
)
FOR DATABASE_MIRRORING (
AUTHENTICATION = CERTIFICATE SQLHOST_CER
, ENCRYPTION = REQUIRED ALGORITHM AES
, ROLE = ALL
);
:::: SQLHOST_CER is the SQL Server Certificate authentication
CREATE CERTIFICATE SQLHOST_CER
WITH SUBJECT = 'SQLHOST certificate for database mirroring',
EXPIRY_DATE = '01/01/2020';
Friday, March 30, 2018
Read Excel File in C# / SSIS script task
Today, I will discuss how to Read an Excel File.
Read from an Excel file: Follow the below steps
1. Create a connection, OleDbConnection, to read the excel
2. Retrieve all Sheet Names into DataTable
3. Read data from a Sheet and store into DataSet
4. Read each row from DataSet and Print to Console
Add the namespace "using System.Data.OleDb;"
STEP 1. Create a connection
you have to change the Provider Microsoft.ACE.OLEDB.12.0 as per the Excel version.
change the file name and location also.
-------------------
OleDbConnection excelConnection;
string excelConnectionString = "Provider=Microsoft.ACE.OLEDB.12.0;"
+ @"Data Source=C:\MyExcel.xlsx;"
+ "Extended Properties='Excel 8.0;IMEX=1;HDR=NO;TypeGuessRows=0;ImportMixedTypes=Text'";
excelConnection = new OleDbConnection(excelConnectionString);
excelConnection.Open();
-------------------
now our Excel connection is open to read the file contants.
STEP 2: Choose the Sheet Name to Read data.
Now we will retrieve all Sheet names into DataTable
----------------------
DataTable excelDataTable = excelConnection.GetOleDbSchemaTable(OleDbSchemaGuid.Tables, null);
foreach (DataRow row in excelDataTable.Rows)
{
string excelSheetName = row["TABLE_NAME"].ToString().Trim("'".ToCharArray());
Console.writeLine(excelSheetName);
}
----------------------
STEP 3: Read data from a Sheet and store into DataSet
by below code we will get all data of a Sheet onto excelDataSet
-------------
OleDbDataAdapter excelAdapter = new OleDbDataAdapter();
excelCommand = new OleDbCommand();
DataSet excelDataSet = new DataSet ();
excelCommand.Connection = excelConnection;
excelCommand.CommandText = "Select * from [" + excelSheetName + "]";
excelAdapter.SelectCommand = excelCommand;
excelAdapter.Fill(excelDataSet);
--------------
STEP 4: Read each row from DataSet and Print to Console
# read all data...
foreach (DataRow dr in excelDataSet.Tables[0].Rows)
{
Console.writeLine(dr[0].ToString() + " - " + dr[1].ToString() );
}
#if you want to get actual column names of OLEDB .. try below
foreach (DataColumn dc in excelDataSet.Tables[0].Columns)
{
Console.Write(dc.ColumnName);
}
#if the first row contains Column names then you try below code to get all values ..
foreach (object columnName in excelDataSet.Tables[0].Rows[0].ItemArray)
{
Console.Write(columnName.ToString());
}
Wednesday, March 28, 2018
Executable/Tool to Send Email as HTML with Attachment & Embedded Picture
Today I am sharing a Tool/exe to send email from anywhere instantly!
always we so redundant task/ write code for the same like email sent, which is frequently used to automate a system and notify the progress... for what I have created an executable to send mail from everywhere.
Please click here to download the executable: Send_Email.zip
also, you can download the source code, click here!
Look at the below image for the options to use. YES, you can attach embedded an image with the mail!
you can get this help message by executing Send_Email.exe without any parameter
Let's see how do I use this tool to send a mail. it's very easy!
The first example is to send a simple mail with an attachment
you can write the body as HTML body
always we so redundant task/ write code for the same like email sent, which is frequently used to automate a system and notify the progress... for what I have created an executable to send mail from everywhere.
Please click here to download the executable: Send_Email.zip
also, you can download the source code, click here!
Look at the below image for the options to use. YES, you can attach embedded an image with the mail!
you can get this help message by executing Send_Email.exe without any parameter
- Send_Email.exe [no parameter]
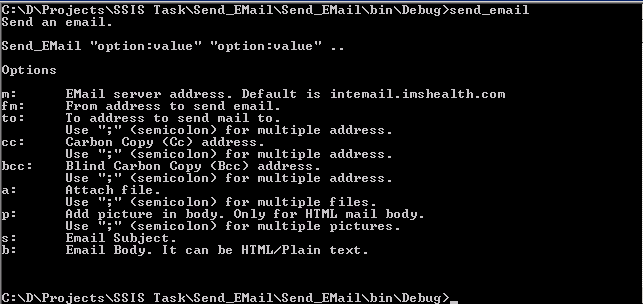 |
| Send Email Options |
The first example is to send a simple mail with an attachment
- Send_EMail.exe "m:SMTP_SERVER_ADDRESS" "to:saiful024@gmail.com" "s:testsubject" "b:Test Body" "fm:saiful.azam@bd.imshealth.com" "a:C:\TEST_ATTACHEMENT.txt"
you can write the body as HTML body
- Send_EMail.exe "m:SMTP_SERVER_ADDRESS" "to:saiful024@gmail.com" "s:testsubject" "b:<b>Test Body</b>" "fm:saiful.azam@bd.imshealth.com" "a:C:\TEST_ATTACHEMENT.txt"
also you can add pic to the mail
- Send_EMail.exe "m:MAIL_SERVER_ADDRESS" "to:saiful024@gmail.com" "s:testsubject" "b:Test <b>Body</b><br><img src=cid:IQVIA >" "fm:saiful.azam@bd.imshealth.com" "a:C:\TEST_ATTACHEMENT.txt" "p:C:\IQVIA.jpg"
NOTE: you can use "user:USER_NAME" & "pass:PASSWORD" options to provide the SMTP authentication.

Send Mail with Embedded Pic and Attachment
| Send Email Command |
Tuesday, March 27, 2018
Connect SQL Server and Execute Procedure [get data-set/rows/return value] from C#.NET
I will connect to SQL Server database and execute a procedure to get data.
a procedure can provide data by Return or as a Select statement.
I have discussed the full process step-by-step and also added the full C# code/class at the bottom of this post!
here is the DBO.Test_Proc , which i will call and get data & return value.
-------------------
Create Procedure dbo.Test_Proc @param1 int = null, @param2 varchar = null
as
begin
select @param1 as param1 , @param2 as param1 ;
return isnull(@param1,-50);
end
------------------
now we have to call this procedure to get data from the select statement and from return statement as well.
step 0: use package System.Data.SqlClient = using System.Data.SqlClient;
step 1: First we have to connect to SQL server
step 2: Prepare the SQL command to call the procedure
step 3: Execute & Read data rows and return value.
STEP 1: Connect to SQL server
use below code to connect to SQL Server using SQL_Server user..
------------------
SqlConnection cnn;
string sqlConnectionString = "Data Source=SERVER_ADDRESS;Initial Catalog=" + "DB_NAME"
+ ";User ID=" + "USER_NAME" + ";Password=" + "PASSWORD";
try
{
cnn = new SqlConnection();
cnn.ConnectionString = sqlConnectionString;
cnn.Open();
Console.WriteLine("Connection Open");
}
catch (Exception e)
{
Console.WriteLine(e.Message);
}
-----------------
STEP 2: SQL command to call the procedure
use below code to prepare the SQL Command to execute using above SQL Connection (cnn)
--------------------------
SqlCommand cmd;
string[] paramN = { "param1", "param2" };
string[] paramV = { "10","Name"};
cmd = new SqlCommand(sqlCommand, cnn);
cmd.CommandType = CommandType.StoredProcedure;
// add parameter to pass value to DB Proc
// 1st parameter = param1
if (!string.IsNullOrEmpty( paramV[0]))
cmd.Parameters.AddWithValue("@"+paramN[0], paramV[0]);
// 2nd parameter = param2
if (!string.IsNullOrEmpty(paramV[1]))
cmd.Parameters.AddWithValue("@" + paramN[1], paramV[1]);
// add a return type parameter [only if you required the return value from db proc]
var retParam = cmd.Parameters.Add("@retv", SqlDbType.Int);
retParam.Direction = ParameterDirection.ReturnValue;
--------------------------
STEP 3: Execute the SQL Command (cmd) and Read data rows & return value.
use below code to get data rows from proc and the return value also.
----------------------------
SqlDataReader dr;
// get data rows return by the select of proc
dr = cmd.ExecuteReader();
Console.WriteLine("executed");
while (dr.Read())
{
Console.WriteLine(dr[paramN[0]].ToString() + " -- " + dr[paramN[1]].ToString());
}
dr.close();
//// get return value by the retrun of proc
cmd.ExecuteNonQuery();
var retValue = retparam.Value;
Console.WriteLine(retValue);
---------------------------
---------------------------
OUTPUT
---------------------------
Please check below for the full C# class, i have written for me only :)
//--------------------------------------------------------------------------------\\
using System;
using System.Collections.Generic;
using System.Linq;
using System.Text;
using System.Data;
using System.Data.SqlClient;
namespace FTP_MONITORING_EXE
{
class FTP_MONITORING
{
SqlConnection cnn;
SqlCommand cmd;
SqlDataReader dr;
string sqlConnectionString = "Data Source=SERVER_ADDRESS;Initial Catalog=" + "DB_NAME" + ";User ID=" + "USER_NAME" + ";Password=" + "PASSWORD";
static void Main(string[] args)
{
FTP_MONITORING fm = new FTP_MONITORING();
int conS = fm.getSQLConnection();
if (conS == 0) return;
string[] paramV = { "10","Name"};
string[] paramN = { "param1", "param2" };
int retVal = fm.execProc("dbo.testProc", paramV, paramN);
Console.WriteLine("return = " + retVal);
}
int execProc(string sqlCommand, string[] paramV, string[] paramN)
{
cmd = new SqlCommand(sqlCommand, cnn);
cmd.CommandType = CommandType.StoredProcedure;
for (int i = 0; i < paramN.Length; i++)
{
if (!string.IsNullOrEmpty(paramV[i]))
cmd.Parameters.AddWithValue("@" + paramN[i], paramV[i]);
}
SqlParameter retparam = cmd.Parameters.Add("@retv", SqlDbType.Int);
retparam.Direction = ParameterDirection.ReturnValue;
dr = cmd.ExecuteReader();
Console.WriteLine("executed");
while (dr.Read())
{
string output="";
for (int i = 0; i < paramN.Length; i++)
{
output = output + dr[paramN[i]].ToString() + " -- ";
}
Console.WriteLine(output);
}
dr.Close();
cmd.ExecuteNonQuery();
var retValue = retparam.Value;
Console.WriteLine("retValue = " + retValue);
cmd.Dispose();
return (int)retValue;
}
int getSQLConnection()
{
try
{
cnn = new SqlConnection();
cnn.ConnectionString = sqlConnectionString;
cnn.Open();
Console.WriteLine("Connection Open");
return 1;
}
catch (Exception e)
{
Console.WriteLine(e.Message);
return 0;
}
}
}
}
a procedure can provide data by Return or as a Select statement.
I have discussed the full process step-by-step and also added the full C# code/class at the bottom of this post!
here is the DBO.Test_Proc , which i will call and get data & return value.
-------------------
Create Procedure dbo.Test_Proc @param1 int = null, @param2 varchar = null
as
begin
select @param1 as param1 , @param2 as param1 ;
return isnull(@param1,-50);
end
------------------
now we have to call this procedure to get data from the select statement and from return statement as well.
step 0: use package System.Data.SqlClient = using System.Data.SqlClient;
step 1: First we have to connect to SQL server
step 2: Prepare the SQL command to call the procedure
step 3: Execute & Read data rows and return value.
STEP 1: Connect to SQL server
use below code to connect to SQL Server using SQL_Server user..
------------------
SqlConnection cnn;
string sqlConnectionString = "Data Source=SERVER_ADDRESS;Initial Catalog=" + "DB_NAME"
+ ";User ID=" + "USER_NAME" + ";Password=" + "PASSWORD";
try
{
cnn = new SqlConnection();
cnn.ConnectionString = sqlConnectionString;
cnn.Open();
Console.WriteLine("Connection Open");
}
catch (Exception e)
{
Console.WriteLine(e.Message);
}
-----------------
STEP 2: SQL command to call the procedure
use below code to prepare the SQL Command to execute using above SQL Connection (cnn)
--------------------------
SqlCommand cmd;
string[] paramN = { "param1", "param2" };
string[] paramV = { "10","Name"};
cmd = new SqlCommand(sqlCommand, cnn);
cmd.CommandType = CommandType.StoredProcedure;
// add parameter to pass value to DB Proc
// 1st parameter = param1
if (!string.IsNullOrEmpty( paramV[0]))
cmd.Parameters.AddWithValue("@"+paramN[0], paramV[0]);
// 2nd parameter = param2
if (!string.IsNullOrEmpty(paramV[1]))
cmd.Parameters.AddWithValue("@" + paramN[1], paramV[1]);
// add a return type parameter [only if you required the return value from db proc]
var retParam = cmd.Parameters.Add("@retv", SqlDbType.Int);
retParam.Direction = ParameterDirection.ReturnValue;
--------------------------
STEP 3: Execute the SQL Command (cmd) and Read data rows & return value.
use below code to get data rows from proc and the return value also.
----------------------------
SqlDataReader dr;
// get data rows return by the select of proc
dr = cmd.ExecuteReader();
Console.WriteLine("executed");
while (dr.Read())
{
Console.WriteLine(dr[paramN[0]].ToString() + " -- " + dr[paramN[1]].ToString());
}
dr.close();
//// get return value by the retrun of proc
cmd.ExecuteNonQuery();
var retValue = retparam.Value;
Console.WriteLine(retValue);
---------------------------
---------------------------
OUTPUT
---------------------------
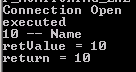 |
| Connect SQL Server and Execute Stored Procedure |
Please check below for the full C# class, i have written for me only :)
//--------------------------------------------------------------------------------\\
using System;
using System.Collections.Generic;
using System.Linq;
using System.Text;
using System.Data;
using System.Data.SqlClient;
namespace FTP_MONITORING_EXE
{
class FTP_MONITORING
{
SqlConnection cnn;
SqlCommand cmd;
SqlDataReader dr;
string sqlConnectionString = "Data Source=SERVER_ADDRESS;Initial Catalog=" + "DB_NAME" + ";User ID=" + "USER_NAME" + ";Password=" + "PASSWORD";
static void Main(string[] args)
{
FTP_MONITORING fm = new FTP_MONITORING();
int conS = fm.getSQLConnection();
if (conS == 0) return;
string[] paramV = { "10","Name"};
string[] paramN = { "param1", "param2" };
int retVal = fm.execProc("dbo.testProc", paramV, paramN);
Console.WriteLine("return = " + retVal);
}
int execProc(string sqlCommand, string[] paramV, string[] paramN)
{
cmd = new SqlCommand(sqlCommand, cnn);
cmd.CommandType = CommandType.StoredProcedure;
for (int i = 0; i < paramN.Length; i++)
{
if (!string.IsNullOrEmpty(paramV[i]))
cmd.Parameters.AddWithValue("@" + paramN[i], paramV[i]);
}
SqlParameter retparam = cmd.Parameters.Add("@retv", SqlDbType.Int);
retparam.Direction = ParameterDirection.ReturnValue;
dr = cmd.ExecuteReader();
Console.WriteLine("executed");
while (dr.Read())
{
string output="";
for (int i = 0; i < paramN.Length; i++)
{
output = output + dr[paramN[i]].ToString() + " -- ";
}
Console.WriteLine(output);
}
dr.Close();
cmd.ExecuteNonQuery();
var retValue = retparam.Value;
Console.WriteLine("retValue = " + retValue);
cmd.Dispose();
return (int)retValue;
}
int getSQLConnection()
{
try
{
cnn = new SqlConnection();
cnn.ConnectionString = sqlConnectionString;
cnn.Open();
Console.WriteLine("Connection Open");
return 1;
}
catch (Exception e)
{
Console.WriteLine(e.Message);
return 0;
}
}
}
}
//----------------------------------------------------------------\\
Wednesday, March 7, 2018
Dynamically Create Data Warehouse (DWH) Dimension - Star Schema Dimension
Today I am sharing a procedure by which we can easily create a dimension for a data warehouse. this is very much dynamic and you know dynamic things are not so easy BUT I have tried to create something user-friendly.
first of all, we have to know about DWH dimension types. it can be FLAT or PARENT-CHILD (hierarchical).
NOTE: This Dynamic procedure is only to create PARENT-CHILD (hierarchical) dimension. if you try you can also create a part of the FLAT dimension.
FLAT Dimension: which dimension table contains flat information with some ID for main/PK column and other important columns. see below table ...
PARENT-CHILD / Hierarchical Dimension: which dimension table contains all code in one column as PK and maintain a relationship with other attribute using parent code as a parent-child hierarchy. see below ..
NOTE: This Dynamic procedure is only to create PARENT-CHILD / Hierarchical dimension. if you try you can also create a part of the FLAT dimension.
All is you have to pass some parameters. A parameter can be a SQL or CASE statements.
Below is the code of this PROC -- also you can download the PROC (click here)
-----------------------------------
GLOBAL_DB.dbo.CREATE_DIM_TABLE
you can place this proc in a database and can use this from any database just make sure the use of tergat db name in table name.
Example:::
Let we have below table to create our Dimansion.
now define the hierarchy..
Level1 = TOTAL MARKET
Level2 = ATC3 = MARKET
Level3 = PRODUCT
so, our output will be as below
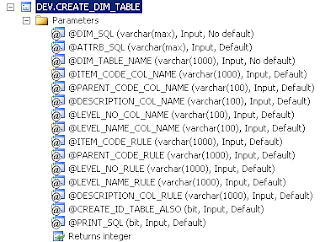
now CALL the proc to create a Table as our output !!
GLOBAL_DB.dbo.CREATE_DIM_TABLE @DIM_SQL = 'select ''TOTAL MARKET'' as TOTAL, ATC3 as MARKET, PRODUCT as PRODUCT from TARGET_DB.dbo.TName ',
@ATTRB_SQL = 'select PRODUCT as DESCRIPTION, MNUFACTURAR from TARGET_DB.dbo.TName ',
@DIM_TABLE_NAME = 'TARGET_DB.dbo.PROD_DIM',
@ITEM_CODE_COL_NAME = 'PRODUCT_CODE',
@PARENT_CODE_COL_NAME = 'PARENT_CODE',
@DESCRIPTION_COL_NAME = 'DESCRIPTION',
@LEVEL_NO_COL_NAME = 'LEVEL_NO',
@LEVEL_NAME_COL_NAME = 'LEVEL_NAME'
@ITEM_CODE_RULE = ' case LEVEL_NO when 1 then ''T'' when 2 then ''M'' else ''P'' end + right (''0000000''+PRODUCT_CODE,8) ',
@PARENT_CODE_RULE = ' case LEVEL_NO when 1 then ''T'' when 2 then ''T'' else ''M'' end + right (''0000000''+PARENT_CODE,8) ',
-- @LEVEL_NO_RULE = 'NA',
-- @LEVEL_NAME_COL_NAME = 'NA',
@DESCRIPTION_COL_RULE = ' A.DESCRIPTION + '' - ''+B.MNUFACTURAR ',
@CREATE_ID_TABLE_ALSO = 0,
@PRINT_SQL = 0;
Below is the code of this PROC -- also you can download the PROC (click here)
---------------------------------------------
first of all, we have to know about DWH dimension types. it can be FLAT or PARENT-CHILD (hierarchical).
NOTE: This Dynamic procedure is only to create PARENT-CHILD (hierarchical) dimension. if you try you can also create a part of the FLAT dimension.
FLAT Dimension: which dimension table contains flat information with some ID for main/PK column and other important columns. see below table ...
PRODUCT_ID
|
PRODUCT
|
MARKET_ID
|
MARKET
|
MANUFACTURER
|
P000001
|
PARA
|
M000001
|
A8A
|
ACI
|
P000002
|
NAPA
|
M000002
|
A7A
|
SQARE
|
PARENT-CHILD / Hierarchical Dimension: which dimension table contains all code in one column as PK and maintain a relationship with other attribute using parent code as a parent-child hierarchy. see below ..
PRODUCT_CODE
|
PARENT_CODE
|
DESCRIPTION
|
LEVEL_NO
|
LEVEL_NAME
|
MNUFACTURAR
|
N000001
|
N000001
|
TOTAL MARKET
|
1
|
TOTAL
|
|
M000001
|
N000001
|
A8A
|
2
|
MARKET
|
|
M000002
|
N000001
|
A7A
|
2
|
MARKET
|
|
P000001
|
M000001
|
PARA
|
3
|
PRODUCT
|
ACI
|
P000002
|
M000002
|
NAPA
|
3
|
PRODUCT
|
SQARE
|
NOTE: This Dynamic procedure is only to create PARENT-CHILD / Hierarchical dimension. if you try you can also create a part of the FLAT dimension.
All is you have to pass some parameters. A parameter can be a SQL or CASE statements.
Below is the code of this PROC -- also you can download the PROC (click here)
-----------------------------------
GLOBAL_DB.dbo.CREATE_DIM_TABLE
you can place this proc in a database and can use this from any database just make sure the use of tergat db name in table name.

@DIM_SQL
|
SQL for the Hierarchy and main
dimension;
like select level1, level2, level3… from DB_NAME.dbo.Table_Name; Hierarchy sequence is must use full table name with db name like DB_NAME.dbo.Table_Name
column name would be the LEVEL_NAME
|
@ATTRB_SQL
|
SQL for additional columns in final
dimension; internal Synonym of this SQL is "B"
You can say additional attributes like Manufacturer. DECSRIPTION_COLUMN is must; like below to add additional attributes only available in level3 select level3 as DESCRIPTION_COLUMN, Man from DB_NAME.dbo.Table_Name |
@DIM_TABLE_NAME
|
Full Table Name like
DB_NAME.dbo.Table_Name
|
@ITEM_CODE_COL_NAME
|
Name for Child Column which is
primary key; like PRODUCT_ID
|
@PARENT_CODE_COL_NAME
|
Name for parent column to maintain
relation of hierarchy
|
@DESCRIPTION_COL_NAME
|
Name for Description column, which
will contain the values from Hierarchy SQL (DIM_SQL)
|
@LEVEL_NO_COL_NAME
|
Name for LEVEL Number column of
Hierarchy level no
|
@LEVEL_NAME_COL_NAME
|
Name for LEVEL Name column of
Hierarchy
|
@ITEM_CODE_RULE
|
you can change ITEM_CODE here
using CASE, subSQL etc by using synonym "A"
|
@PARENT_CODE_RULE
|
you can change PARENT_CODE here
using CASE, subSQL etc by using synonym "A"
|
@LEVEL_NO_RULE
|
you can change LEVEL_NO here using
CASE, subSQL etc by using synonym "A"
|
@LEVEL_NAME_RULE
|
you can change LEVEL_NAME here
using CASE, subSQL etc by using synonym "A"
|
@DESCRIPTION_COL_RULE
|
you can change Description by
using Synonym "A" & "B"
|
@CREATE_ID_TABLE_ALSO
|
if you want Intermediate FLAT_DIM,
set it 1 ;
internally this table has the synonym "A"
|
@PRINT_SQL
|
if you like to see all SQL
generated by this proc; set it 1
|
Example:::
Let we have below table to create our Dimansion.
PRODUCT
|
ATC3
|
MANUFACTURER
|
PARA
|
A8A
|
ACI
|
NAPA
|
A7A
|
SQARE
|
now define the hierarchy..
Level1 = TOTAL MARKET
Level2 = ATC3 = MARKET
Level3 = PRODUCT
so, our output will be as below
PRODUCT_CODE
|
PARENT_CODE
|
DESCRIPTION
|
LEVEL_NO
|
LEVEL_NAME
|
MNUFACTURAR
|
T000001
|
T000001
|
TOTAL MARKET
|
1
|
TOTAL
| |
M000001
|
T000001
|
A8A
|
2
|
MARKET
| |
M000002
|
T000001
|
A7A
|
2
|
MARKET
| |
P000001
|
M000001
|
PARA -
|
3
|
PRODUCT
|
ACI
|
P000002
|
M000002
|
NAPA -
|
3
|
PRODUCT
|
SQARE
|
now CALL the proc to create a Table as our output !!
GLOBAL_DB.dbo.CREATE_DIM_TABLE @DIM_SQL = 'select ''TOTAL MARKET'' as TOTAL, ATC3 as MARKET, PRODUCT as PRODUCT from TARGET_DB.dbo.TName ',
@ATTRB_SQL = 'select PRODUCT as DESCRIPTION, MNUFACTURAR from TARGET_DB.dbo.TName ',
@DIM_TABLE_NAME = 'TARGET_DB.dbo.PROD_DIM',
@ITEM_CODE_COL_NAME = 'PRODUCT_CODE',
@PARENT_CODE_COL_NAME = 'PARENT_CODE',
@DESCRIPTION_COL_NAME = 'DESCRIPTION',
@LEVEL_NO_COL_NAME = 'LEVEL_NO',
@LEVEL_NAME_COL_NAME = 'LEVEL_NAME'
@ITEM_CODE_RULE = ' case LEVEL_NO when 1 then ''T'' when 2 then ''M'' else ''P'' end + right (''0000000''+PRODUCT_CODE,8) ',
@PARENT_CODE_RULE = ' case LEVEL_NO when 1 then ''T'' when 2 then ''T'' else ''M'' end + right (''0000000''+PARENT_CODE,8) ',
-- @LEVEL_NO_RULE = 'NA',
-- @LEVEL_NAME_COL_NAME = 'NA',
@DESCRIPTION_COL_RULE = ' A.DESCRIPTION + '' - ''+B.MNUFACTURAR ',
@CREATE_ID_TABLE_ALSO = 0,
@PRINT_SQL = 0;
Below is the code of this PROC -- also you can download the PROC (click here)
---------------------------------------------
CREATE PROCEDURE [DBO].[CREATE_DIM_TABLE] @DIM_SQL VARCHAR(MAX)
 , @ATTRB_SQL VARCHAR(MAX) = 'NA'
 , @DIM_TABLE_NAME VARCHAR(1000)
 , @ITEM_CODE_COL_NAME VARCHAR(1000) = 'ITEM_CODE'
 , @PARENT_CODE_COL_NAME VARCHAR(100) = 'PARENT_CODE'
 , @DESCRIPTION_COL_NAME VARCHAR(100) = 'DESCRIPTION_COLUMN'
 , @LEVEL_NO_COL_NAME VARCHAR(100) = 'LEVEL_NUMBER'
 , @LEVEL_NAME_COL_NAME VARCHAR(100) = 'LEVEL_NAME'
 , @ITEM_CODE_RULE VARCHAR(1000) = 'NA'
 , @PARENT_CODE_RULE VARCHAR(1000) = 'NA'
 , @LEVEL_NO_RULE VARCHAR(1000) = 'NA'
 , @LEVEL_NAME_RULE VARCHAR(1000) = 'NA'
 , @DESCRIPTION_COL_RULE VARCHAR(1000) = 'NA'
 , @CREATE_ID_TABLE_ALSO BIT = 0
 , @PRINT_SQL BIT = 0
AS
BEGIN
 DECLARE @DB_NAME VARCHAR(100) = isnull(PARSENAME(@DIM_TABLE_NAME, 3), DB_NAME());
 DECLARE @Drop_SQL NVARCHAR(2000);
 SET NOCOUNT ON
 DECLARE @isTable BIT = 'False'

 IF (
   @ITEM_CODE_RULE = 'NA'
   OR @ITEM_CODE_RULE = ''
   )
  SET @ITEM_CODE_RULE = @ITEM_CODE_COL_NAME

 IF (
   @PARENT_CODE_RULE = 'NA'
   OR @PARENT_CODE_RULE = ''
   )
  SET @PARENT_CODE_RULE = @PARENT_CODE_COL_NAME

 IF (
   @LEVEL_NAME_RULE = 'NA'
   OR @LEVEL_NAME_RULE = ''
   )
  SET @LEVEL_NAME_RULE = @LEVEL_NAME_COL_NAME

IF (
   @LEVEL_NO_RULE = 'NA'
   OR @LEVEL_NO_RULE = ''
   )
  SET @LEVEL_NO_RULE = @LEVEL_NO_COL_NAME

 IF (
   @DESCRIPTION_COL_RULE = 'NA'
   OR @DESCRIPTION_COL_RULE = ''
   )
  SET @DESCRIPTION_COL_RULE = 'a.' + @DESCRIPTION_COL_NAME

 IF (@ATTRB_SQL = '')
  SET @ATTRB_SQL = 'NA'

 DECLARE @metaDataTableSQL VARCHAR(MAX) = 'select * into ##tmpMataDataScript from ' + CASE @isTable
   WHEN 'True'
    THEN @DIM_SQL
   ELSE ' ( ' + @DIM_SQL + ' )'
   END + ' a'
 DECLARE @mataDataSQL VARCHAR(MAX) = 'select * from ##tmpMataDataScript'

 IF object_id('tempdb..##tmpMataDataScript') IS NOT NULL
 BEGIN
  DROP TABLE ##tmpMataDataScript
 END

 DECLARE @Columns TABLE (
  TABLE_QUALIFIER VARCHAR(500)
  , TABLE_OWNER VARCHAR(500)
  , TABLE_NAME VARCHAR(500)
  , COLUMN_NAME VARCHAR(500)
  , DATA_TYPE VARCHAR(500)
  , TYPE_NAME VARCHAR(500)
  , PRECISION VARCHAR(500)
  , LENGTH VARCHAR(500)
  , SCALE VARCHAR(500)
  , RADIX VARCHAR(500)
  , NULLABLE VARCHAR(500)
  , REMARKS VARCHAR(500)
  , COLUMN_DEF VARCHAR(500)
  , SQL_DATA_TYPE VARCHAR(500)
  , SQL_DATETIME_SUB VARCHAR(500)
  , CHAR_OCTET_LENGTH VARCHAR(500)
  , ORDINAL_POSITION VARCHAR(500)
  , IS_NULLABLE VARCHAR(500)
  , SS_DATA_TYPE VARCHAR(500)
  )

 EXEC (@metaDataTableSQL)

 INSERT INTO @Columns
 EXEC tempdb..sp_columns @table_name = N'##tmpMataDataScript'

 UPDATE @Columns
 SET COLUMN_NAME = QUOTENAME(COLUMN_NAME)

 DECLARE @Table_ID TABLE (
  ORDINAL_POSITION INT
  , COLUMN_NAME VARCHAR(1000)
  , COLUMN_GROUP VARCHAR(1000)
  , CONDITION VARCHAR(5000)
  , LEFT_COLUMN_NAME AS ('a' + cast(ORDINAL_POSITION AS VARCHAR) + '.' + QUOTENAME('ia' + cast(ORDINAL_POSITION AS VARCHAR) + '_' + COLUMN_NAME + '_code')
   )
  , LEFT_JOIN AS (
   ' LEFT JOIN (
 SELECT cast(ROW_NUMBER() OVER (
    ORDER BY ' + COLUMN_GROUP + ') AS VARCHAR) ' + QUOTENAME('ia' + cast(ORDINAL_POSITION AS
     VARCHAR) + '_' + COLUMN_NAME + '_code ') + ',' + COLUMN_GROUP + ' from Data ia' + cast(ORDINAL_POSITION AS VARCHAR) + ' group by ' + COLUMN_GROUP +
   ' ) ' + 'a' + cast(ORDINAL_POSITION AS VARCHAR) + ' ON ' + CONDITION
   )
  , UNION_ALL AS (
   'SELECT ' + QUOTENAME(COLUMN_NAME + '_CODE') + ' AS @ITEM_CODE_COL_NAME, ' + QUOTENAME('LEVEL' + cast((ORDINAL_POSITION - 1) AS
     VARCHAR) + '_CODE') + ' as @PARENT_CODE_COL_NAME, ' + COLUMN_NAME + ' AS @DESCRIPTION_COL_NAME, ''' + cast(ORDINAL_POSITION AS VARCHAR) + '''' +
   ' AS @LEVEL_NO_COL_NAME, ' + '''' + replace(replace(COLUMN_NAME, '[', ''), ']', '') + '''' + ' AS @LEVEL_NAME_COL_NAME ' + ' from ' + '@DIM_TABLE_NAME' +
   ' GROUP BY ' + QUOTENAME('LEVEL' + cast((ORDINAL_POSITION - 1) AS VARCHAR) + '_CODE') + ' , ' + QUOTENAME(COLUMN_NAME + '_CODE') +
   ',' + COLUMN_NAME
   )
  )

 INSERT INTO @Table_ID (
  ORDINAL_POSITION
  , COLUMN_NAME
  )
 SELECT ORDINAL_POSITION
  , COLUMN_NAME
 FROM @Columns
 ORDER BY ORDINAL_POSITION

 UPDATE @Table_ID
 SET COLUMN_GROUP = substring((
    SELECT ',' + COLUMN_NAME
    FROM @Table_ID b
    WHERE a.ORDINAL_POSITION >= b.ORDINAL_POSITION
    FOR XML path('')
    ), 2, 50000)
  , CONDITION = substring((
    SELECT ' AND  a.' + COLUMN_NAME + '=' + 'a' + cast(ORDINAL_POSITION AS VARCHAR) + '.' + COLUMN_NAME
    FROM @Table_ID b
    WHERE a.ORDINAL_POSITION >= b.ORDINAL_POSITION
    FOR XML path('')
    ), 5, 50000)
 FROM @Table_ID a

 DECLARE @FINAL_QUERY VARCHAR(MAX) = 'WITH Data as (' + @DIM_SQL + ') select '
 DECLARE @left_join VARCHAR(MAX) = ''
 DECLARE @FINAL_QUERY_SELECT VARCHAR(MAX) = ''

 SELECT @FINAL_QUERY_SELECT = @FINAL_QUERY_SELECT + ', a.' + a.COLUMN_NAME + ', ' + a.LEFT_COLUMN_NAME + ' AS ' + QUOTENAME(a.COLUMN_NAME + '_CODE')
  , @left_join = @left_join + a.LEFT_JOIN
 FROM @Table_ID a

 SET @FINAL_QUERY = @FINAL_QUERY + substring(@FINAL_QUERY_SELECT, 2, 50000) + ' INTO ' + @DIM_TABLE_NAME + '_ID' + ' from Data a ' + @left_join

 SET @Drop_SQL = 'IF EXISTS (
   SELECT *
   FROM ' + @DB_NAME + '.sys.objects
   WHERE object_id = OBJECT_ID(''' + @DIM_TABLE_NAME + '' +
  '_ID'')
    AND type IN (N''U'')
   )
  EXEC (''DROP TABLE ' + @DIM_TABLE_NAME + '' + '_ID'')';

 EXEC (@Drop_SQL)

 IF @PRINT_SQL = 1
  PRINT @FINAL_QUERY

 EXEC (@FINAL_QUERY)

 SET @FINAL_QUERY_SELECT = ''

 SELECT @FINAL_QUERY_SELECT = @FINAL_QUERY_SELECT + ' UNION ALL ' + a.UNION_ALL
 FROM @Table_ID a

 SET @FINAL_QUERY_SELECT = SUBSTRING(@FINAL_QUERY_SELECT, 12, 50000)

 SELECT @FINAL_QUERY_SELECT = CASE
   WHEN a.ORDINAL_POSITION = 1
    THEN replace(replace(@FINAL_QUERY_SELECT, 'LEVEL0', a.COLUMN_NAME + ']'), 'LEVEL1', a.COLUMN_NAME + ']')
   ELSE replace(@FINAL_QUERY_SELECT, 'LEVEL' + cast(ORDINAL_POSITION AS VARCHAR), a.COLUMN_NAME + ']')
   END
 FROM @Table_ID a

 DECLARE @DIM_TABLE_NAME_INT VARCHAR(1050) = @DIM_TABLE_NAME + CASE @ATTRB_SQL
   WHEN 'NA'
    THEN ''
   ELSE '_INT'
   END

 SET @FINAL_QUERY_SELECT =
  'select @ITEM_CODE_RULE as @ITEM_CODE_COL_NAME,@PARENT_CODE_RULE as @PARENT_CODE_COL_NAME,@DESCRIPTION_COL_NAME,@LEVEL_NO_RULE as @LEVEL_NO_COL_NAME,@LEVEL_NAME_RULE as @LEVEL_NAME_COL_NAME INTO '
  + @DIM_TABLE_NAME_INT + ' from ( ' + replace(@FINAL_QUERY_SELECT, '@DIM_TABLE_NAME', @DIM_TABLE_NAME + '_ID') +
  ' ) a ORDER BY cast (@LEVEL_NO_COL_NAME as int),' + CASE rtrim(LTRIM(@ITEM_CODE_RULE))
   WHEN rtrim(LTRIM(@PARENT_CODE_RULE))
    THEN ''
   ELSE CASE
     WHEN @PARENT_CODE_RULE = @PARENT_CODE_COL_NAME
      THEN 'cast(@PARENT_CODE_RULE as int), '
     ELSE '@PARENT_CODE_RULE, '
     END
   END + CASE
   WHEN @ITEM_CODE_RULE = @ITEM_CODE_COL_NAME
    THEN ' cast(@ITEM_CODE_RULE as int)'
   ELSE ' @ITEM_CODE_RULE'
   END

 SET @Drop_SQL = 'IF EXISTS (
   SELECT *
   FROM ' + @DB_NAME + '.sys.objects
   WHERE object_id = OBJECT_ID(''' + @DIM_TABLE_NAME_INT +
  ''')
    AND type IN (N''U'')
   )
  EXEC (''DROP TABLE ' + @DIM_TABLE_NAME_INT + ''')';

 EXEC (@Drop_SQL)

 SET @FINAL_QUERY_SELECT = REPLACE(@FINAL_QUERY_SELECT, '@ITEM_CODE_COL_NAME', @ITEM_CODE_COL_NAME)
 SET @FINAL_QUERY_SELECT = replace(@FINAL_QUERY_SELECT, '@PARENT_CODE_COL_NAME', @PARENT_CODE_COL_NAME)
 SET @FINAL_QUERY_SELECT = replace(@FINAL_QUERY_SELECT, '@DESCRIPTION_COL_NAME', @DESCRIPTION_COL_NAME)
 SET @FINAL_QUERY_SELECT = replace(@FINAL_QUERY_SELECT, '@LEVEL_NO_COL_NAME', @LEVEL_NO_COL_NAME)
 SET @FINAL_QUERY_SELECT = replace(@FINAL_QUERY_SELECT, '@LEVEL_NAME_COL_NAME', @LEVEL_NAME_COL_NAME)
 SET @FINAL_QUERY_SELECT = replace(@FINAL_QUERY_SELECT, '@ITEM_CODE_RULE', @ITEM_CODE_RULE)
 SET @FINAL_QUERY_SELECT = replace(@FINAL_QUERY_SELECT, '@PARENT_CODE_RULE', @PARENT_CODE_RULE)
 SET @FINAL_QUERY_SELECT = replace(@FINAL_QUERY_SELECT, '@LEVEL_NO_RULE', @LEVEL_NO_RULE)
 SET @FINAL_QUERY_SELECT = replace(@FINAL_QUERY_SELECT, '@LEVEL_NAME_RULE', @LEVEL_NAME_RULE)

 IF @PRINT_SQL = 1
  PRINT @FINAL_QUERY_SELECT

 EXEC (@FINAL_QUERY_SELECT)

 SET @Drop_SQL = 'IF EXISTS (
   SELECT *
   FROM ' + @DB_NAME + '.sys.objects
   WHERE object_id = OBJECT_ID(''' + @DIM_TABLE_NAME + '' +
  '_ID'')
    AND type IN (N''U'')
   )
   AND ' + cast(@CREATE_ID_TABLE_ALSO AS VARCHAR) + ' = 0
  EXEC (''DROP TABLE ' + @DIM_TABLE_NAME + '' +
  '_ID'')';

 EXEC (@Drop_SQL)

 IF @DIM_TABLE_NAME <> @DIM_TABLE_NAME_INT
 BEGIN
  SET @metaDataTableSQL = 'select * into ##tmpMataDataScript from ' + ' ( ' + @ATTRB_SQL + ' )' + ' a'
  SET @mataDataSQL = 'select * from ##tmpMataDataScript'

  IF object_id('tempdb..##tmpMataDataScript') IS NOT NULL
  BEGIN
   DROP TABLE ##tmpMataDataScript
  END

  DELETE
  FROM @Columns

  EXEC (@metaDataTableSQL)

  INSERT INTO @Columns
  EXEC tempdb..sp_columns @table_name = N'##tmpMataDataScript'

  UPDATE @Columns
  SET COLUMN_NAME = QUOTENAME(COLUMN_NAME)

  SET @FINAL_QUERY_SELECT = 'select ' + 'a.' + @ITEM_CODE_COL_NAME + ', a.' + @PARENT_CODE_COL_NAME + ',' + @DESCRIPTION_COL_RULE + ' as ' + @DESCRIPTION_COL_NAME +
   ', a.' + @LEVEL_NO_COL_NAME + ', a.' + @LEVEL_NAME_COL_NAME

  SELECT @FINAL_QUERY_SELECT = @FINAL_QUERY_SELECT + ', b.' + a.COLUMN_NAME
  FROM @Columns a
  WHERE a.COLUMN_NAME NOT LIKE '%' + @DESCRIPTION_COL_NAME + '%'
  ORDER BY a.ORDINAL_POSITION

  SET @FINAL_QUERY_SELECT = @FINAL_QUERY_SELECT + ' into ' + @DIM_TABLE_NAME + ' from ' + @DIM_TABLE_NAME_INT + ' a ' + ' left join (' + @ATTRB_SQL + ') b on a.' +
   @DESCRIPTION_COL_NAME + ' = b.' + @DESCRIPTION_COL_NAME + ' order by cast(a.' + @LEVEL_NO_COL_NAME + ' as int) , ' + CASE
    WHEN @PARENT_CODE_RULE = @PARENT_CODE_COL_NAME
     THEN 'cast(' + 'a.' + @PARENT_CODE_COL_NAME + ' as int), '
    ELSE 'a.' + @PARENT_CODE_COL_NAME + ' ,'
    END + CASE
    WHEN @ITEM_CODE_RULE = @ITEM_CODE_COL_NAME
     THEN 'cast(' + 'a.' + @ITEM_CODE_COL_NAME + ' as int) '
    ELSE 'a.' + @ITEM_CODE_COL_NAME
    END

  IF @PRINT_SQL = 1
   PRINT (@FINAL_QUERY_SELECT)

  SET @Drop_SQL = 'IF EXISTS (
   SELECT *
   FROM ' + @DB_NAME + '.sys.objects
   WHERE object_id = OBJECT_ID(''' + @DIM_TABLE_NAME +
   ''')
    AND type IN (N''U'')
   )
  EXEC (''DROP TABLE ' + @DIM_TABLE_NAME + ''')';

  EXEC (@Drop_SQL)

  EXEC (@FINAL_QUERY_SELECT)

  SET @Drop_SQL = 'IF EXISTS (
   SELECT *
   FROM ' + @DB_NAME + '.sys.objects
   WHERE object_id = OBJECT_ID(''' + @DIM_TABLE_NAME_INT +
   ''')
    AND type IN (N''U'')
   )
  EXEC (''DROP TABLE ' + @DIM_TABLE_NAME_INT + ''')';

  EXEC (@Drop_SQL)
 END
END
Subscribe to:
Posts (Atom)