If you get the error "The specified service does not exist as an installed service.", please dont be panic!
This is a very common issue. Follow below steps to ride on it.
1. First, check the SSIS is installed in the server. for that go to services.msc and try to find the service "SQL Server Integration Services xx" [xx can be 12/13/14 ..]. If there is no service like this, means no SSIS has been installed in this server. OR if you find the service, please follow below steps.
2. This is must, use the same version of SSMS to access the SSIS. If you have the DB permission, then check the DB version. most luckily SSIS and DB version is same. To be sure the version number, I always pick the service number [for my case it was "SQL Server Integration Services 13"]. 13 means SQL Server 16!
3. Once you get the version number of SSIS/DB. Download the SSMS for the same version from here. after install, try to connect to SSIS, I hope you will win!
Also, you can download the Free Developer Edition of SQL Server (SSIS Included) from here .. https://www.microsoft.com/en-us/sql-server/sql-server-downloads
Showing posts with label SSIS. Show all posts
Showing posts with label SSIS. Show all posts
Friday, February 1, 2019

Wednesday, November 29, 2017
Add icon into a SSIS Custom Task
Let, we have already created an SSIS custom task named HelloWorldTask. now we like to add an icon.
see my post to create the HelloWorldTask... also you can download my ready solution of this task.
now, follow the below steps to add an icon to Custom Task...
see my post to create the HelloWorldTask... also you can download my ready solution of this task.
now, follow the below steps to add an icon to Custom Task...
- Icon file should be as .ico extension - in my case, the file name is "Hello.ico"
- Modify the solution
- Build and re/install the task
now the details ... (see image also)
- File name is "Hello.ico".
- Modify the solution (see image "Add Icon to the Solution")
- add the icon file in the solution
- right click on Solution Name in Solution Explorer
- click on Add
- click on "Existing Item..."
- choose the icon file "Hello.ico"
- go to Icon's property and set the "Build Action" as "Embedded Resource"
- right click on the icon item
- click property
- add the icon name to the DtsTask property named "IconResource"
- IconResource="namespaceName.IconNameWithExtension"
- my case - IconResource="Blog_Test_Task.Hello.ico"
- Re/build the solution
 |
| Add Icon to the Solution |
 |
| Icon Added |
Monday, November 27, 2017
Install SSIS Custom Task
I assume we have a dll of our SSIS custom task. in my other post, I have already shared "how to create a SSIS custom task very easily".
assume our DLL name is: TestTask.dll
now follow the below 3 steps: [see below Image for help]
assume our DLL name is: TestTask.dll
now follow the below 3 steps: [see below Image for help]
- install the dll in GAC
- copy the dll to SSIS DTS location
- Test the Task is working
now the details :
- install the dll in GAC (see image)
- find the GACUtill in the "Microsoft SDKs" folder... in my case, it is in "C:\Program Files (x86)\Microsoft SDKs\Windows\v7.0A\Bin\gacutil.exe"
- if you don't have it installed .. you can download it from here (click here).
- open Command Prompt as Administrator
- now execute below
- "C:\Program Files (x86)\Microsoft SDKs\Windows\v7.0A\Bin\gacutil.exe" -if "C:\TestProj\bin\Debug\Test_Task.dll"
- copy the dll to SSIS DTS location (see image)
- now find your Microsoft SQL Server location and go to DTS\Task folder
- in my case, it is in "C:\Program Files (x86)\Microsoft SQL Server\100\DTS\Tasks"
- the folder "100" may vary due to SQL server version.
- now copy the dll and past it to the Tasks folder, you may need administrator permission.
- Test the Task is working (see image)
- open the Visual Studio.
- close it if already open then open it again.
- create/open an SSIS project
- now look at the toolbox.
- if the task is already there then we are done
- if the Task is not in there then follow below
- right click on ToolBox, then click on "Chose Item".
- OR click "Tools" menu -> click "Choose ToolBox Items..."
- a new window will come with all of the Installed tasks...
- go to "SSIS Control Flow Items" [in general all goes to this location]
- select/check your Task(HelloWorld)
- click ok
 |
| Install SSIS Custom Task |
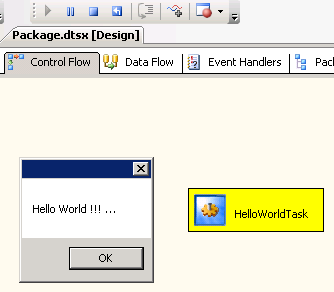 |
| Test to Run the Task |
Monday, November 20, 2017
Create SSIS Custom Task with complete example
Here i am sharing the easiest way to create a SSIS custom task.. this a "Hello World" Task.
by following this way can can create your own task very easily. also i have uploaded the solution folder, so you can modify it to create your own one.
also see my other posts to know more about SSIS custom task like a UI, Tabs on UI, Icon for your custom task etc..
Theory (be patience..)
Follow below 5 simple steps..
Detail description on above steps ...
STEP 1: create a blank "Class Library" application in visual studio. for example "Test_Task".
STEP 2: add some fixed code, you can say header.
STEP 5: create a strong key for this dll and attache with it! (see image for all - "Strong Name Key")
by following this way can can create your own task very easily. also i have uploaded the solution folder, so you can modify it to create your own one.
also see my other posts to know more about SSIS custom task like a UI, Tabs on UI, Icon for your custom task etc..
Theory (be patience..)
Follow below 5 simple steps..
- create a blank project (.dll/library type project)
- add some fixed code/reference, you can say header. (Image-"Blank Project with Task Info")
- override 3 procedures of inherited class "Task". (Image - "Override Procedures")
- prepare get/set for input/output variables -- [this will be available in the expression option of SSIS task property!] (Image - "get-set")
- create a strong key for this dll and attache with it! (Image - "Strong Name Key")
- Install it (see my post)
- Add Icon to this Task
STEP 1: create a blank "Class Library" application in visual studio. for example "Test_Task".
STEP 2: add some fixed code, you can say header.
- Add Reference : add reference "Microsoft.SQLServer.ManagedDTS". you can find it on sql-server installed location ... "..\100\SDK\Assemblies\*.dll" (my case)
- Use Reference: add on top "using Microsoft.Sqlserver.Dts.Runtime;"
- Add Task Info:
- add "[assembly: CLSCompliant(true)]" outside of namespace. see image.
- add below property for task - "[DtsTask(name="value",...)]", inside namespace but outside of class. see image
- Inherit the class "Task"
- see image "Blank Project with Task Info"
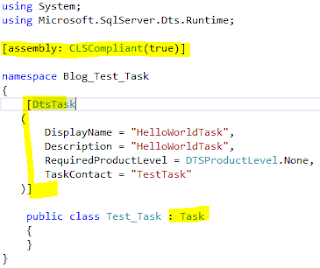
Blank Project with Task Info

STEP 3: override 3 procedures
- Inherit the class "Task"
- declare a variable to use .. my case - "private string text="Hello World SSIS...";"
- Now override 3 procedures of Task class .. Validate, InitilizeTask & Execute
- add code of lines from the image "override procedures".
- you can modify as you want
 |
| Override Procedures |
STEP 4: prepare get/set for input/output variables
- prepare get-set for your variables ... see image "get-set"
- in my case this is "public string TestInput { get { return this.txet;} set { this.txet = value;}}"
 |
| get-set |
- NOW BUILD the SOLUTION
- a .dll file will be available in the debug OR release folder. thats out required .dll file :)
- go to "project properties". [on solution explorer ->right click on solution-> click properties]
- click -> "Signing" tab
- check "Sign the assembly"
- select "<New>.." [new window will open]
- un-check "Protect .. Password"
- give a name for you Stron Name Key (.snk) file in "Key file name".. my case "Test_Task"
- click "OK"
- a new item (.snk file) will be available (at bottom) in the "solution explorer". my case "Test_Task.snk"
- save the solution (ctrl+s)
- NOW BUILD the SOLUTION
- now the dll is ready to install in GAC .. check my post to install this dll as SSIS Task
 |
| Strong Name Key |
Subscribe to:
Posts (Atom)